**DirectX Raytracing, Tutorial 3**
**Creating a basic, rasterized G-buffer**
As [discussed in our tutorial introduction](../../dxr_tutors.md.html), our goal is to provide
a simple infrastructure for getting a DirectX Raytracing application up and running without
digging around in low-level API specification documents. Tutorial 3 continues with our sequence
covering some infrastructure basics before we get to the meat of implementing a path tracer.
If you wish to move on to a tutorial with actual DirectX Raytracing programming,
[jump ahead to Tutorial 4](../Tutor4/tutorial04.md.html).
Why Create a G-Buffer?
===============================================================================
[Tutorial 2](../Tutor2/tutorial02.md.html) showed you how to use a more complex *`RenderPass`* to
launch a simple HLSL pixel shader. Before moving on to actually using ray tracing in [Tutorial 4](../Tutor4/tutorial04.md.html),
we'll walk through how to interact with Falcor-loaded scene files and create a set of traditional
vertex and pixel shaders that run over this geometry during rasterization.
The shaders we use to demonstrate this will create a [G-Buffer](https://en.wikipedia.org/wiki/Deferred_shading)
that we can use to accelerate ray tracing in later tutorials. In fact, [Tutorial 5](../Tutor5/tutorial05.md.html)
uses a _hybrid renderer_ that rasterizes primary visibility and only uses DirectX Raytracing to shoot
shadow rays.
As an additional benefit, in order to extract the data to populate our G-buffer, we walk through
various Falcor shader utilities that allow you to access scene properties like textures and materials.
A More Complex Rendering Pipeline
=================================================================================
If you open up *`Tutor03-RasterGBuffer.cpp`*, you will find a slightly more complex main program
that defines the following *`RenderingPipeline`*:
~~~~~~~~~~~~~~~~~~~~ C
// Create our rendering pipeline
RenderingPipeline *pipeline = new RenderingPipeline();
pipeline->setPass(0, SimpleGBufferPass::create());
pipeline->setPass(1, CopyToOutputPass::create());
~~~~~~~~~~~~~~~~~~~~
Now, there are _two_ render passes: *`SimpleGBufferPass`* and *`CopyToOutputPass`*. For every frame,
these are executed in sequence. First *`SimpleGBufferPass`* is executed, and it stores its output
in textures managed by our *`ResourceManager`*. This allows subsequent passes, like *`CopyToOutputPass`*
to access and reuse these intermediate results. This structure allows us to build modular and reusable code. In fact,
we'll reuse the *`SimpleGBufferPass`* we write here in [Tutorial 5](../Tutor5/tutorial05.md.html),
without modification.
In this particular tutorial, *`SimpleGBufferPass`* creates a [G-Buffer](https://en.wikipedia.org/wiki/Deferred_shading)
containing each pixel's position, surface normal, diffuse color, specular color, and z-buffer. *`CopyToOutputPass`*
simply allows the user to select, via the GUI, which of those outputs to show and then copies the
appropriate buffer to the *`kOutputChannel`* to display.
Handling the Falcor Scene and Launching Rasterization
=================================================================================
Start by looking in *`SimpleGBufferPass.h`*. This should look familiar, as the boilerplate is
nearly identical to that from the *`RenderPasses`* we wrote in [Tutorials 1](../Tutor1/tutorial01.md.html) [and 2](../Tutor2/tutorial02.md.html).
The major difference is in our pass' member variables:
~~~~~~~~~~~~~~~~~~~~ C
GraphicsState::SharedPtr mpGfxState; // DirectX state
Scene::SharedPtr mpScene; // Falcor scene abstraction
RasterLaunch::SharedPtr mpRaster; // Encapsulates rasterization pass
~~~~~~~~~~~~~~~~~~~~
As in [Tutorial 2](../Tutor2/tutorial02.md.html), the *`GraphicsState`* class encapsulates various
DirectX rendering state like the depth, rasterization, blending, and culling settings.
The *`Scene`* class encapsultes Falcor's scene representation. It has a variety of accessor methods to
provide access the cameras, lights, geometry, and other details. For these tutorials, we will mostly
pass *`mpScene`* into our rendering wrappers and let Falcor automatically send the data to the GPU.
The *`RasterLaunch`* is similar to the *`FullscreenLaunch`* class from [Tutorial 2](../Tutor2/tutorial02.md.html), except it
encapsulates state for rasterizing complex scene geometry (rather than a screen-aligned quad).
Initializing our G-Buffer Pass
------------------------------
Our *`SimpleGBufferPass::initialize()`* method is slightly more complex that in our prior passes:
~~~~~~~~~~~~~~~~~~~~ C
bool SimpleGBufferPass::initialize(RenderContext::SharedPtr pRenderContext,
ResourceManager::SharedPtr pResManager)
{
// Stash a copy of our resource manager for later
mpResManager = pResManager;
// Tell our resource manager that we expect to write these channels
mpResManager->requestTextureResource("WorldPosition");
mpResManager->requestTextureResource("WorldNormal");
mpResManager->requestTextureResource("MaterialDiffuse");
mpResManager->requestTextureResource("MaterialSpecRough");
mpResManager->requestTextureResource("MaterialExtraParams");
mpResManager->requestTextureResource("Z-Buffer",
ResourceFormat::D24UnormS8,
ResourceManager::kDepthBufferFlags);
// Define our raster pipeline state (though we use the defaults)
mpGfxState = GraphicsState::create();
// Create our wrapper for a scene rasterization pass.
mpRaster = RasterLaunch::createFromFiles("gBuffer.vs.hlsl", "gBuffer.ps.hlsl");
mpRaster->setScene(mpScene);
return true;
}
~~~~~~~~~~~~~~~~~~~~
There's a couple of important things to note here:
* We no longer write to *`kOutputChannel`*. Thus, *`SimpleGBufferPass`* does not form
a complete rendering pipeline. If no subsequent pass uses our intermediate results
to write to *`kOutputChannel`*, nothing will appear on screen!
* When requesting buffers, the names are unimportant. If a subsequent pass requests access to a buffer
with the same name, it will be shared.
* For the *`Z-Buffer`*, we use a more complex *`requestTextureResource()`* call.
The second parameter specifies the resource format (using a 24 bit depth and 8 bit stencil).
We also need to specify how it can be bound, since DirectX depth buffers have different limitations.
The constant *`kDepthBufferFlags`* stores good defaults for a depth buffer.
* When not using the more complex request, buffers default to RGBA textures using 32-bit floats for
each channel. The bind flags default to *`kDefaultFlags`*, which provide good defaults for all
textures that are not used for depth or stencil.
We then create our raster wrapper *`mpRaster`* by pointing it to our vertex and pixel shaders.
For our *`RasterLaunch`*, it needs to know what scene to use. In case our scene has already been
loaded prior to initialization, we pass the scene into our wrapper.
Handling Scene Loading
------------------------------
Our tutorial application automatically adds a GUI button to allow users to open a scene file. When
Falcor loads a scene, all passes have the option to process it by overriding the *`RenderPass::initScene()`*
method:
~~~~~~~~~~~~~~~~~~~~ C
void SimpleGBufferPass::initScene(RenderContext::SharedPtr pRenderContext,
Scene::SharedPtr pScene)
{
// Stash a copy of the scene
mpScene = pScene;
// Update our raster pass wrapper with this scene
if (mpRaster)
mpRaster->setScene(mpScene);
}
~~~~~~~~~~~~~~~~~~~~
For our G-buffer class, this is very simple:
* Store a copy of the scene pointer so we can access it later.
* Tell our raster pass that we're using a new scene.
Launching our G-Buffer Rasterization pass
------------------------------
Now that we initialized our rendering resources and loaded our scene file, we can launch our
G-buffer rasterization.
~~~~~~~~~~~~~~~~~~~~ C
void SimpleGBufferPass::execute(RenderContext::SharedPtr pRenderContext)
{
// Create a framebuffer for rendering. (Should avoid doing each frame)
Fbo::SharedPtr outputFbo = mpResManager->createManagedFbo(
{ "WorldPosition", "WorldNormal", "MaterialDiffuse",
"MaterialSpecRough", "MaterialExtraParams" },
"Z-Buffer" );
// Clear all color buffers to (0,0,0,0), depth to 1, stencil to 0
pRenderContext->clearFbo(outputFbo.get(), vec4(0, 0, 0, 0), 1.0f, 0);
// Rasterize! Note: Falcor will populate many built-in shader variables
mpRaster->execute(pRenderContext, mpGfxState, outputFbo);
}
~~~~~~~~~~~~~~~~~~~~
First, we need a framebuffer to write the results of our rendering pass. As
in [Tutorial 2](../Tutor2/tutorial02.md.html), we call *`createManagedFbo()`*, albeit with
a more complex set of parameters. Again, this creation should not occur once
per frame for performance reasons, though here we do for simplicity and clarity.
When calling *`createManagedFbo`*, the first parameter is a list of names of
resources managed by our *`ResourceManager`*. (Note that these buffers were
all requested during initialization.) These will be the color buffers in our
framebuffer, and are bound in the order specified (so *`"WorldPosition"`* is
*`SV_Target0`* in our DirectX shader and *`"MaterialExtraParams"`* is *`SV_Target4`*).
The second parameter is the name of the resource to bind as a depth texture.
We then clear this newly created framebuffer using a Falcor built-in. This
method clears all 5 color buffers to black, clears the depth buffer to 1.0f and
the stencil buffer to 0.
Finally, we launch our rasterization pass. *`execute()`* requres the
DirectX context, the DirectX graphics state to use, and the framebuffer
to store results.
The DirectX HLSL for Our G-Buffer Rasterization
===============================================================================
Our vertex shader appears somewhat cryptic, since we use Falcor utility
functions to access the scene data and pass it to our pixel shader appropriately:
~~~~~~~~~~~~~~~~~~~~~C
// ---- gBuffer.vs.hlsl ----
#include "VertexAttrib.h"
__import ShaderCommon;
__import DefaultVS;
VertexOut main(VertexIn vIn)
{
return defaultVS(vIn);
}
~~~~~~~~~~~~~~~~~~~~~
Falcor has a default vertex shader called *`defaultVS`* that we can use after the *`__import DefaultVS;`*
(The code is in the file *`DefaultVS.slang`*.) This default shader accesses standard scene
attributes (see *`VertexAttrib.h`*), applies appropriate viewing, animation, and camera matrices, and stores
the results into a *`VertexOut`* structure (which is also defined in *`DefaultVS.slang`*). Note that
the *`__import`* lines are not standard HLSL, but rather invoke our framework's shader preprocessor / special-purpose compiler,
[Slang](http://graphics.cs.cmu.edu/projects/slang/).
Fundamentally, this is a very simple vertex shader that applies a few matrices to the vertex positions and normals,
but the default shader gracefully handles different scenes geometry that may or may not have any combination
of: normals, bitangents, texture coordinates, lightmaps, geometric skinning, plus a few other advanced features.
The more interesting shader, our pixel shader, follows:
~~~~~~~~~~~~~~~~~~~~~C
// ---- gBuffer.ps.hlsl ----
__import Shading; // To get ShadingData structure & shading helper funcs
__import DefaultVS; // To get the VertexOut declaration
struct GBuffer
{
float4 wsPos : SV_Target0; // Specific bindings here determined by the
float4 wsNorm : SV_Target1; // order of buffers in the call to
float4 matDif : SV_Target2; // createManagedFbo() in our method
float4 matSpec : SV_Target3; // SimpleGBufferPass::execute()
float4 matExtra : SV_Target4;
};
GBuffer main(VertexOut vsOut, float4 pos: SV_Position)
{
// A Falcor built-in to extract geometry and material data suitable for
// shading. (See ShaderCommon.slang for the structure and routines)
ShadingData hitPt = prepareShadingData(vsOut, gMaterial, gCamera.posW);
// Dump out our G buffer channels
GBuffer gBufOut;
gBufOut.wsPos = float4(hitPt.posW, 1.f);
gBufOut.wsNorm = float4(hitPt.N, length(hitPt.posW - gCamera.posW) );
gBufOut.matDif = float4(hitPt.diffuse, hitPt.opacity);
gBufOut.matSpec = float4(hitPt.specular, hitPt.linearRoughness);
gBufOut.matExtra = float4(hitPt.IoR,
hitPt.doubleSidedMaterial ? 1.f : 0.f,
0.f, 0.f);
return gBufOut;
}
~~~~~~~~~~~~~~~~~~~~~
The first couple lines include Falcor built-ins by asking our Slang shader preprocessor
to import various common definitions and functions.
We then declare the structure of our output framebuffer's render targets. This needs
to match what we specified in the C++ code (when we created our framebuffer
via *`createManagedFbo`*).
Finally, we define our *`main`* routine for our pixel shader to take in the *`VertexOut`*
structure from our vertex shader and outputs to the framebuffer of the approriate format.
We start by calling a Falcor built-in that uses our interploated geometry attributes, the
scene's materials (in the Falcor-defined shader variable *`gMaterial`*) and the current
camera position (in Falcor variable *`gCamera`*) to extract commonly used data needed for
shading. We then store some of this data out into our G-buffer:
1. Our pixel's world-space position *`hitPt.posW`*
2. Our pixel's world-space normal *`hitPt.N`* and distance from fragment to the camera.
3. Our diffuse material (including texture) color and alpha value.
4. Our specular reflectance and surface roughness.
5. A miscellanous buffer containing index-of-refraction and a flag determining if the
surface should be considered double-sided when shading.
This is an extremely verbose G-buffer, using five 128-bit buffers, which is significantly
more than most people would consider reasonable. However, this is done for simplicity and
clarity. It should be straightforward to compress this data into a more compact format.
Implementing our CopyToOutputPass
===============================================================================
As noted above, our *`SimpleGBufferPass`* does not write to the shared resource *`kOutputChannel`*,
so another pass is required to generate an image. Our *`CopyToOutputPass`* executes the following
code when it renders:
~~~~~~~~~~~~~~~~~~~~ C
void CopyToOutputPass::execute(RenderContext::SharedPtr pRenderContext)
{
// Get the Falcor texture we're copying and our output buffer
Texture::SharedPtr inTex = mpResManager->getTexture(mSelectedBuffer);
Texture::SharedPtr outTex = mpResManager->getClearedTexture(
ResourceManager::kOutputChannel,
vec4(0.0, 0.0, 0.0, 0.0));
// If we selected an invalid texture, return.
if (!inTex) return;
// Copy the selected input buffer to our output buffer.
pRenderContext->blit( inTex->getSRV(), outTex->getRTV() );
}
~~~~~~~~~~~~~~~~~~~~
From the *`ResourceManager`* we get the texture the user requested and our output buffer.
Here we use the method *`getClearedTexture()`* to first clear the output to black
before returning it.
If our input texture is valid, we then copy the input to the output using the Falcor built-in *`blit()`*.
([Blit](https://en.wikipedia.org/wiki/Bit_blit) is an older graphics term that often means _copy_, or more specifically _block image transfer_.)
We allow the user to select *`mSelectedBuffer`* via a GUI dropdown widget from the list of options in *`mDisplayableBuffers`*:
~~~~~~~~~~~~~~~~~~~~ C
void CopyToOutputPass::renderGui(Gui* pGui)
{
pGui->addDropdown("Displayed", mDisplayableBuffers, mSelectedBuffer);
}
~~~~~~~~~~~~~~~~~~~~
A new method in *`CopyToOutputPass`* is *`pipelineUpdated()`*, which
gets called whenever passes get added or removed from our *`RenderingPipeline`*.
The idea here is to create a GUI dropdown list containing all possible textures in
the resource manager that we can display:
~~~~~~~~~~~~~~~~~~~~ C
void CopyToOutputPass::pipelineUpdated(ResourceManager::SharedPtr pResManager)
{
// If our resource manager changed, stash the new pointer
mpResManager = pResManager;
// Clear our GUI list
mDisplayableBuffers.clear();
// Look through all available texture resources
for (uint32_t i = 0; i < mpResManager->getTextureCount(); i++)
{
// If this one isn't the output buffer, add it to the displayables list
if (i == mpResManager->getTextureIndex(ResourceManager::kOutputChannel))
continue;
mDisplayableBuffers.push_back({int(i), mpResManager->getTextureName(i)});
}
}
~~~~~~~~~~~~~~~~~~~~
What Does it Look Like?
===============================================================================
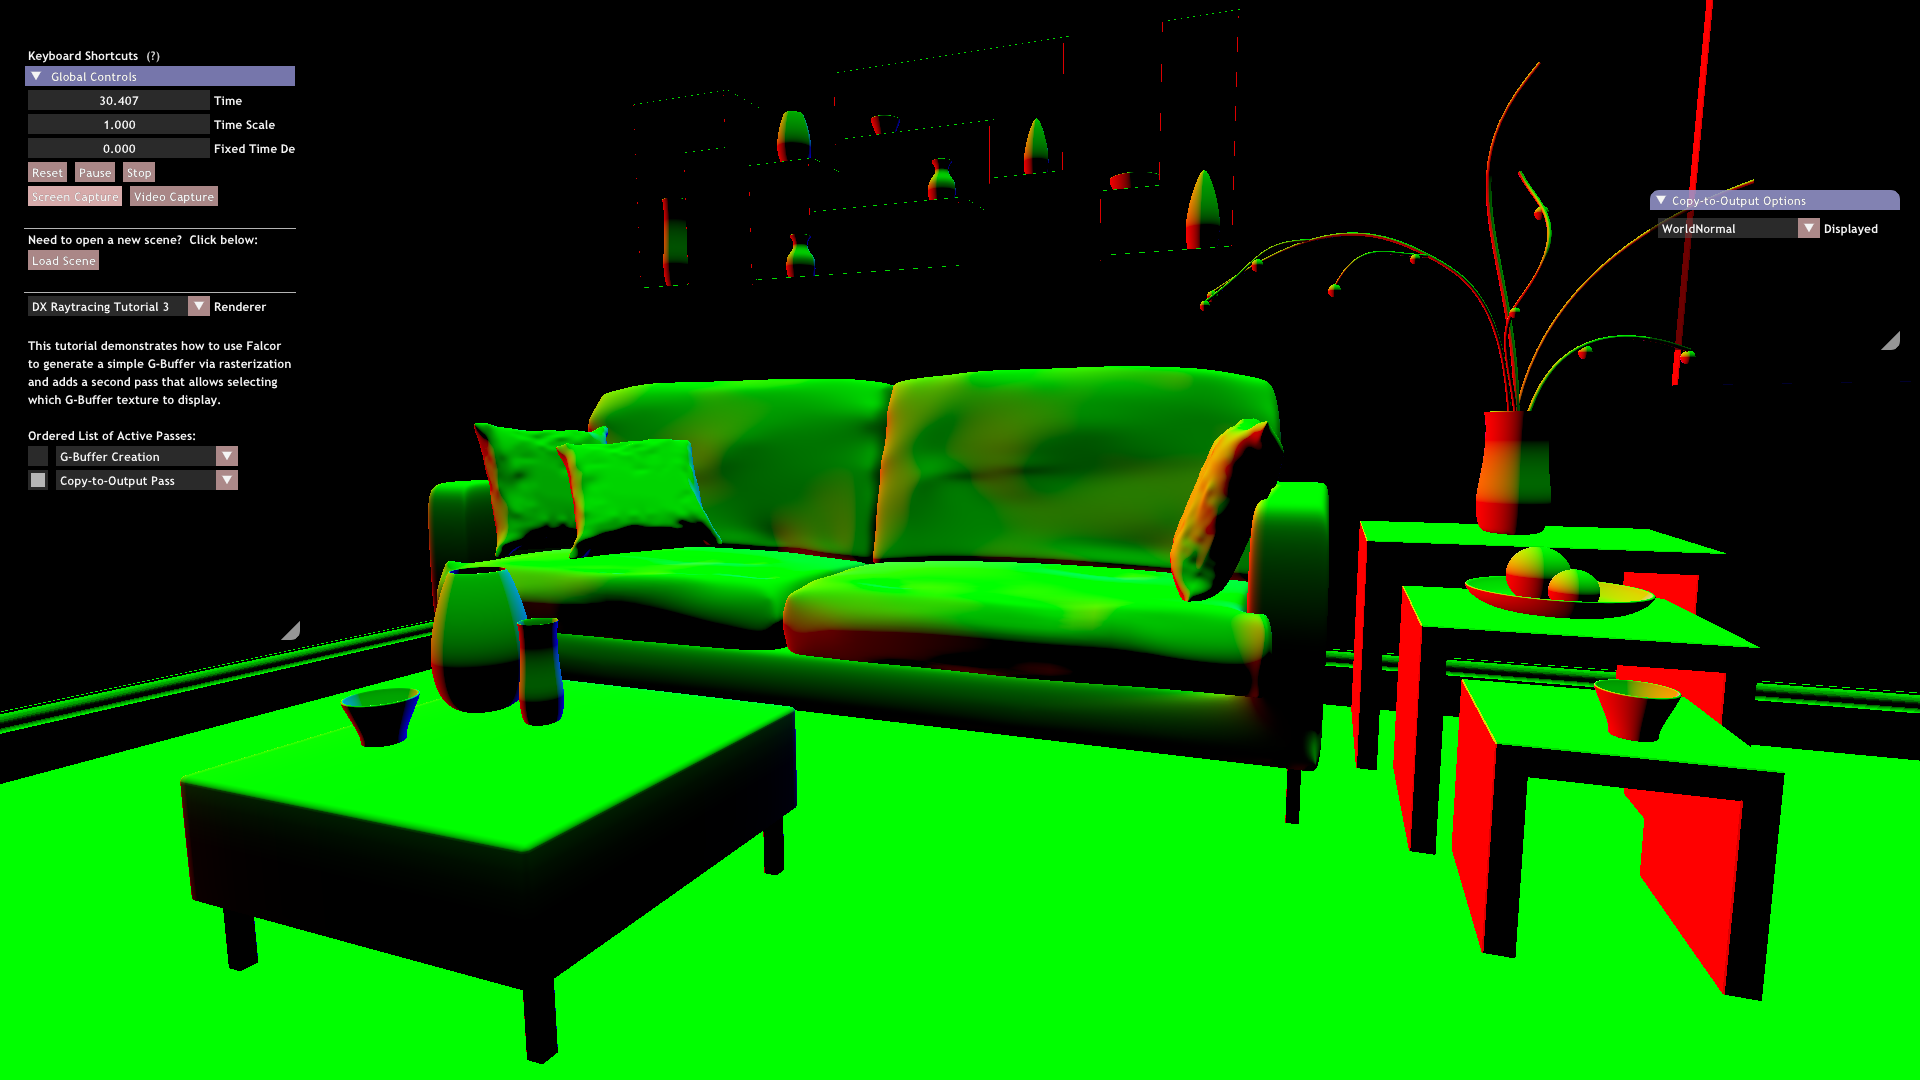
That covers the important points of this tutorial. Now if you run it, you get a result similar to this:
Hopefully, this tutorial demonstrated:
* How to build pipelines of multiple *`RenderPasses`* that share resources.
* How to access Falcor scenes inside your render passes.
* How to rasterize these scenes using fairly basic HLSL vertex and fragment shaders.
When you are ready, continue on to [Tutorial 4](../Tutor4/tutorial04.md.html), where we finally learn how to
spawn rays using DirectX Raytracing.