**DirectX Raytracing, Tutorial 13**
**Adding a tone mapping pass to handle high dyanmic range output**
In [Tutorials 10](../Tutor10/tutorial10.md.html) [and 12](../Tutor12/tutorial12.md.html), we added high dynamic range
environment maps and indirect illumination. With these two additions, we sometimes get renderngs that are
perfectly correct but might be too dark or bright to clearly display on our monitors. As we add more complex
materials (and, eventually, area lighting using actual measured light power) these problems quickly become worse.
This tutorial takes a quick detour to add a pass to [tone map](https://en.wikipedia.org/wiki/Tone_mapping) our
rendered output. Tone mapping and high dynamic range imaging are widely studied areas. Rather than dive into
details, I suggest you find a textbook on the topic (perhaps [this one](https://www.elsevier.com/books/high-dynamic-range-imaging/reinhard/978-0-12-374914-7))
for a guide on picking the right algorithm for your needs.
[Falcor](https://developer.nvidia.com/falcor) has a built-in tone mapping utility, and we are simply going to
expose this utility in a new *`SimpleToneMappingPass`*.
A Render Pass Leveraging Falcor's Tone Mapper
=================================================================================
Unlike the last few tutorials, let's start again from the beginning: the *`main()`* function in
*`Tutor13-SimpleToneMapping.cpp`*. This this tutorial, we are adding a fourth render pass to
out pipeline:
~~~~~~~~~~~~~~~~~~~~C
pipeline->setPass(0, LightProbeGBufferPass::create());
pipeline->setPass(1, SimpleDiffuseGIPass::create("HDRColorOutput"));
pipeline->setPass(2, SimpleAccumulationPass::create("HDRColorOutput"));
pipeline->setPass(3, SimpleToneMappingPass::create("HDRColorOutput",
ResourceManager::kOutputChannel));
~~~~~~~~~~~~~~~~~~~~
Here what we are doing is:
* Creating our G-buffer
* Rendering our one-bounce diffuse global illumination into the *`HDRColorOutput`* texture
* Temporally accumulating from and storing the accumualted result into *`HDRColorOutput`*
* Tone mapping the result from *`HDRColorOutput`* into our final output *`kOutputChannel`*
Defining the Tone Mapping Render Pass
=================================================================================
Our render pass definition in *`SimpleToneMappingPass.h`* is mostly boilerplate, with the key data being:
~~~~~~~~~~~~~~~~~~~~C
std::string mInChannel; // Input texture for tonemapping
std::string mOutChannel; // Output texure from tonemapping
GraphicsState::SharedPtr mpGfxState; // DirectX raster state
ToneMapping::UniquePtr mpToneMapper; // Falcor's tonemapping utility
~~~~~~~~~~~~~~~~~~~~
Here *`mInputChannel`* and *`mOutputChannel`* are input and output buffers, copied from
the constructor (so based on the initialization in *`main()`*, these are *`"HDRColorOutput"`* and *`kOutputChannel`*).
*`mpGfxState`* is a default DirectX pipeline state, as we used in [Tutorial 2](../Tutor2/tutorial02.md.html).
*`mpToneMapper`* is an instantiation of Falcor's tone mapping utility class. There are a number
of methods to configure the tonemapping, including *`setOperator()`*, *`setExposureKey()`*, etc. The
tone mapper class also provides a GUI, so the user can configure the settings dynamically at run time.
Applying our Tone Mapping
=================================================================================
The key operations in *`SimpleToneMappingPass::initialize()`* include:
~~~~~~~~~~~~~~~~~~~~C
mpToneMapper = ToneMapping::create( ToneMapping::Operator::Clamp );
mpGfxState = GraphicsState::create();
~~~~~~~~~~~~~~~~~~~~
The first line instantiates the class and initializes it to use a clamping operator.
The clamp operator does *_no_* tone mapping, essentially copying the input texture to the output.
The second line initializes a default DirectX raster state (needed while tone mapping).
To perform tone mapping, our *`SimpleToneMappingPass::execute()`* looks as follows:
~~~~~~~~~~~~~~~~~~~~C
void SimpleToneMappingPass::execute(RenderContext::SharedPtr pRenderContext)
{
Fbo::SharedPtr srcFbo = mpResManager->createManagedFbo({ mInChannel });
Fbo::SharedPtr dstFbo = mpResManager->createManagedFbo({ mOutChannel });
pRenderContext->pushGraphicsState(mpGfxState);
mpToneMapper->execute(pRenderContext.get(), srcFbo, dstFbo);
pRenderContext->popGraphicsState();
}
~~~~~~~~~~~~~~~~~~~~
The first two lines get our input and output buffers as frame buffer objects
(as required by *`mpToneMapper`*). *`mpToneMapper->execute()`* performs
tone mapping, and the *`pushGraphicsState()`* and *`popGraphicsState()`*
ensure changes in the tone mapper don't affect the rest of our program.
One last observation: in order to expose the class parameters in the UI,
we need to add *`mpToneMapper->renderUI()`* to our *`renderGui()`* method:
~~~~~~~~~~~~~~~~~~~~C
void SimpleToneMappingPass::renderGui(Gui* pGui)
{
mpToneMapper->renderUI(pGui, nullptr);
}
~~~~~~~~~~~~~~~~~~~~
What Does it Look Like?
===============================================================================
That covers the important points of this tutorial. When running, you get the following result:
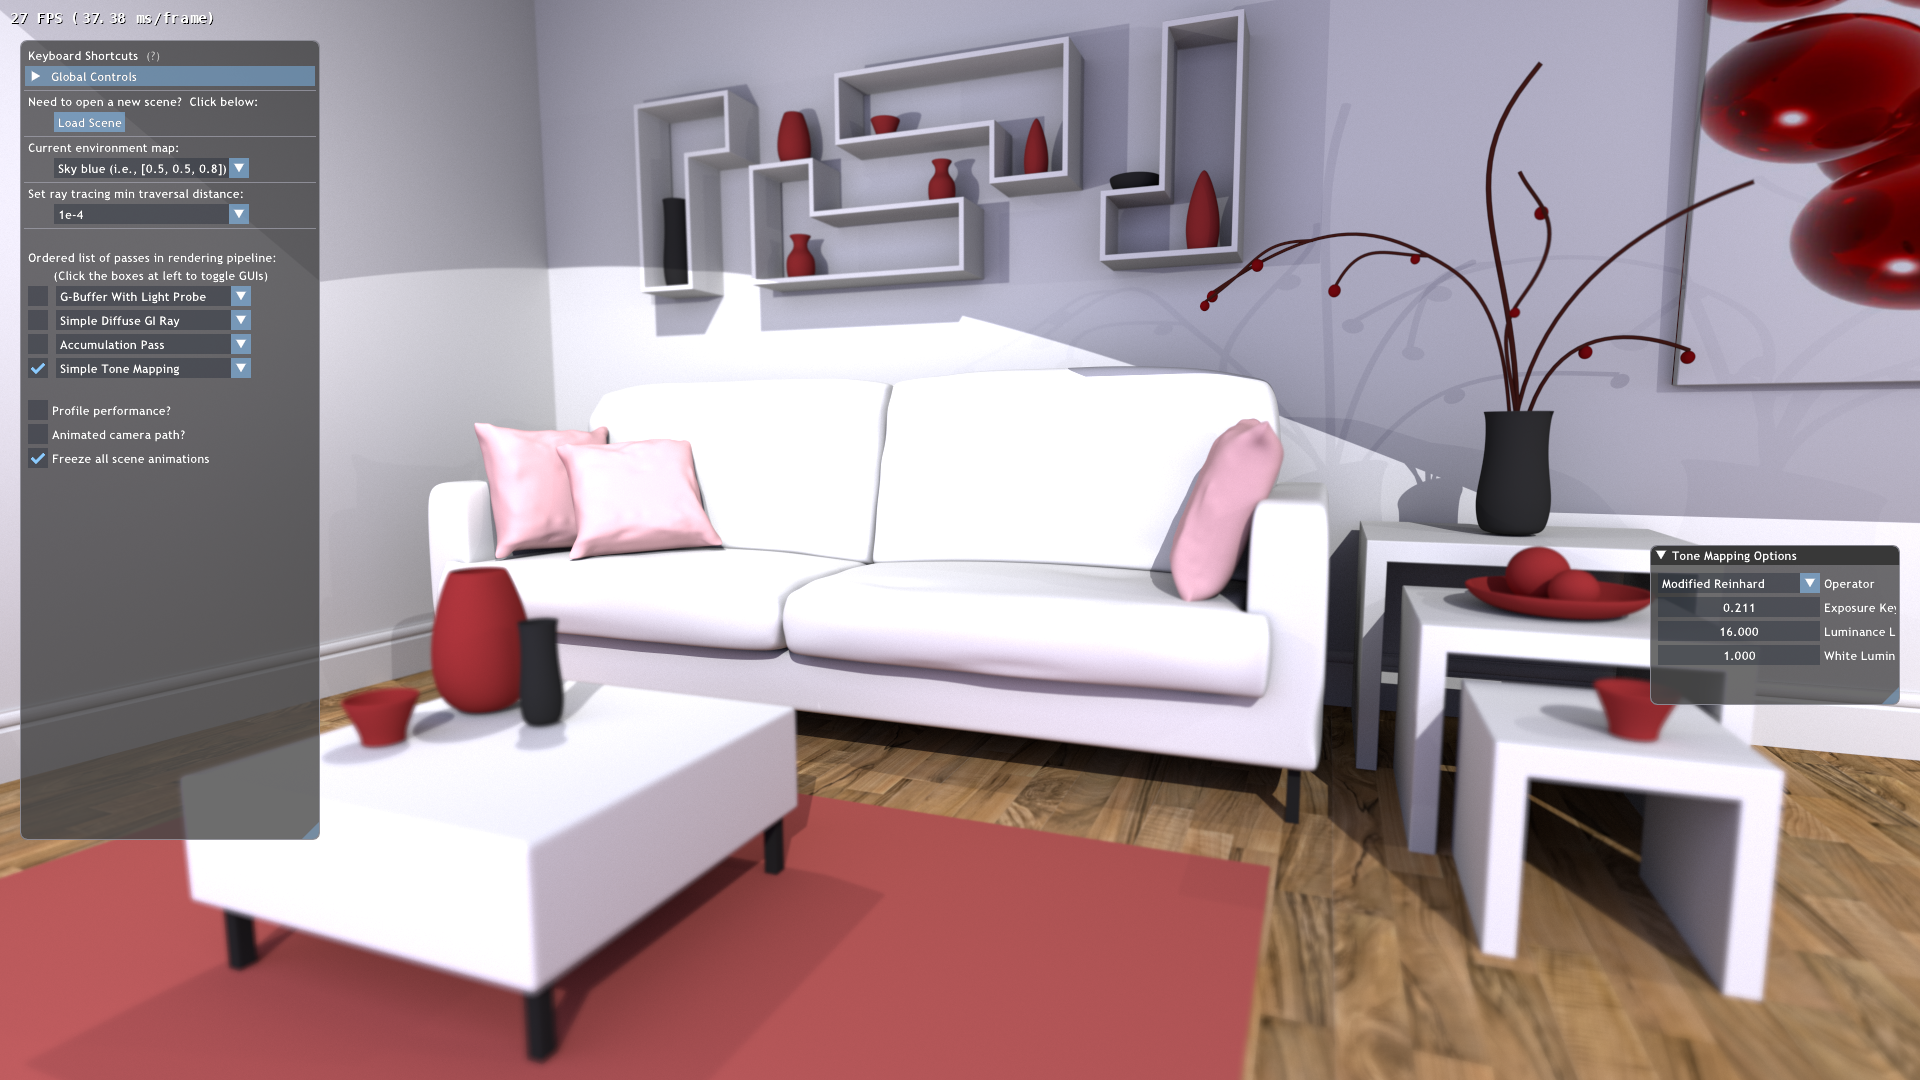
With this tutorial, you can apply Falcor's built-in tone mapping to allow rendering of very dark or
very bright environments.
[Tutorial 14](../Tutor14/tutorial14.md.html) changes our Lambertian material model to use Falcor's
standard [GGX materials](https://www.cs.cornell.edu/~srm/publications/EGSR07-btdf.pdf) and extends our one-bounce global illumination to an arbitrary, user-controllable
number of bounces.