**DirectX Raytracing, Tutorial 1**
**Understanding our tutorial framework and getting a basic program running**
As [discussed in our tutorial introduction](../../dxr_tutors.md.html), our goal is to provide
a simple infrastructure for getting a DirectX Raytracing application up and running without
digging around in low-level API specification documents. So before digging into the meat of
these tutorials, we focus a little on just getting started.
These tutorials build up, step-by-step, to demonstrate a quite complex path tracer with global illumination,
depth-of-field, and physically-based materials. However, the first few tutorials are fairly
simple and focus on understanding the infrastructure we will take for granted in the more advanced tutorials.
If you wish to jump ahead to a tutorial with actual DirectX Raytracing programming,
[jump ahead to Tutorial 4](../Tutor4/tutorial04.md.html).
Our Infrastructure
===============================================================================
These tutorials use [Falcor](https://developer.nvidia.com/falcor), a prototypying framework
I use every day in my job at NVIDIA Research. This is an open source, multi-platform
wrapper around DirectX and Vulkan that is tested daily on NVIDIA, AMD, and Intel hardware, and it
provides common tools needed for baseline graphics experimentation. This includes a GUI,
window management, scene and asset loading, and common abstractions over graphics APIs suitable
for developing graphics algorithms.
I added some additional wrappers around Falcor functionality to simplify creating a modular set
of tutorials and reduce boilerplate code common in many complex graphics APIs. These wrappers
are in the directory *`DXRTutors\SharedUtils`*, but you should not need to look there unless
you need to modify or extend these tutorials in fairly complex ways.
Building a Simple Tutorial Application
===============================================================================
If you open the project *`DXRTutors\01-OpenWindow`*, the main file is *`Tutor01-OpenWindow.cpp`*, and
is just about 20 lines long.
~~~~~~~~~~~~~~~~~~~~ C
#include "Falcor.h"
#include "../SharedUtils/RenderingPipeline.h"
#include "Passes/ConstantColorPass.h"
int WINAPI WinMain(_In_ HINSTANCE hInstance, _In_opt_ HINSTANCE hPrevInstance,
_In_ LPSTR lpCmdLine, _In_ int nShowCmd)
{
// Create our rendering pipeline
RenderingPipeline *pipeline = new RenderingPipeline();
// Add passes into our pipeline
pipeline->setPass(0, ConstantColorPass::create());
// Define a set of configuration for our program
SampleConfig config;
config.windowDesc.title =
"Tutorial 1: Open a window and set up a simple rendering pipeline";
config.windowDesc.resizableWindow = true;
// Start our program!
RenderingPipeline::run(pipeline, config);
}
~~~~~~~~~~~~~~~~~~~~
This starts with some #includes for basic Falcor functionality, the required Falcor extensions
for the DirectX Raytracing API, and the *`RenderingPipeline`* abstraction. Each of the tutorials
is structured as a *`RenderingPipeline`*, which contains an arbitrarily-long sequence of
*`RenderingPasses`*. A frame is rendered by executing each of the render passes in sequence.
In this simple example, there is a single pass called *`ConstantColorPass`*, which displays a
constant color across the entire screen.
The *`SampleConfig`* structure contains various parameters that control the window created by
Falcor. In this case, we specify a title and note that the created window should be resizable.
Finally, we start execution by calling the static method *`RenderingPipeline::run`* with our
tutorial's rendering pipeline and the window configuration.
Defining a New Render Pass
===============================================================================
Before running the program, let's look into what it takes to build a simple *`RenderPass`*. Our *`ConstantColorPass`*
is located in the *`Passes\`* directory. First let's examine the boilerplate:
~~~~~~~~~~~~~~~~~~~~~~~~~~~~~~~~ C
#include "../SharedUtils/RenderPass.h"
class ConstantColorPass : public RenderPass,
inherit_shared_from_this< RenderPass, ConstantColorPass >
{
public:
using SharedPtr = std::shared_ptr< ConstantColorPass >;
static SharedPtr create() { return SharedPtr(new ConstantColorPass()); }
virtual ~ConstantColorPass() = default;
protected:
ConstantColorPass()
: SimpleRenderPass("Constant Color Pass", "Constant Color Options") {}
// Actual functional methods declared below here
...
};
~~~~~~~~~~~~~~~~~~~~~~~~~~~~~~~~
Here, *`RenderPass`* is the abstract class defining the interface a render pass needs
to implement, and this abstract class resides in my directory of wrapper utilities.
Falcor makes heavy use of smart pointers (e.g., based on *`std::shared_ptr`*), and the Falcor
utility class *`inherit_shared_from_this`* ensures derived classes don't end up inheriting
multiple copies of the internal pointers. Most Falcor classes define a *`SharedPtr`* type that
simplifies the template notation when using smart pointers, and our wrappers keep up this tradition.
We want all *`RenderPasses`* to be dynamically created. We enforce this with a *`create`*
constructor. The inputs to the *`SimpleRenderPass`* constructor are strings that will be used
by the GUI display. The first is the name to appear in the list of passes. The second is the
name of this pass' GUI window that contains any user-controllable options it exposes.
The important rendering methods and data in *`ConstantColorPass`* are as follows:
~~~~~~~~~~~~~~~~~~~~~~~~~~~~~~~~ C
bool initialize(RenderContext::SharedPtr pRenderContext,
ResourceManager::SharedPtr pResManager) override;
~~~~~~~~~~~~~~~~~~~~~~~~~~~~~~~~
This method is called when the program and render pass are initialized. As part of initialization,
a render pass receives a Falcor *`RenderContext`*, which allows you to create and access DirectX
state and resources. Additionally, the *`ResourceManager`* is a utility class that enables sharing
of resources between *`RenderPasses`*.
~~~~~~~~~~~~~~~~~~~~~~~~~~~~~~~~ C
void renderGui(Gui* pGui) override;
~~~~~~~~~~~~~~~~~~~~~~~~~~~~~~~~
The *`renderGui`* method is called when drawing the application's GUI and allows you to explicitly
control placement of widgets in the GUI window for this pass. Falcor currently uses
[Dear Imgui](https://github.com/ocornut/imgui) for GUI rendering, and the *`Falcor::Gui`* class is
a light wrapper around Imgui's functionality.
~~~~~~~~~~~~~~~~~~~~~~~~~~~~~~~~ C
void execute(RenderContext::SharedPtr pRenderContext) override;
~~~~~~~~~~~~~~~~~~~~~~~~~~~~~~~~
The *`execute`* method is invoked when rendering a frame. If your pipeline contains multiple passes,
their *`execute`* methods are called in the order of inclusion in the pipeline.
Implementing a New Render Pass
===============================================================================
Now that we've looked at the header for our *`ConstantColorPass`*, let's look at how we implement
each of the three important methods:
~~~~~~~~~~~~~~~~~~~~~~~~~~~~~~~~ C
bool ConstantColorPass::initialize(RenderContext::SharedPtr pRenderContext,
ResourceManager::SharedPtr pResManager)
{
// Remember our resource manager, so we can ask for resources later
mpResManager = pResManager;
// Tell our resource manager that we need access to the output channel
mpResManager->requestTextureResource(ResourceManager::kOutputChannel);
// If we return false, this pass will be removed from our pipeline.
return true;
}
~~~~~~~~~~~~~~~~~~~~~~~~~~~~~~~~
For our simple *`ConstantColorPass`*, we do two important initialization tasks:
1. Keep a copy of our resource manager, so we can access shared textures and buffers
later. *`mpResManager`* is a member variable declared in the base class *`RenderPass`*.
2. Tell the resource manager that this pass requires access to the *`kOutputChannel`* texture.
This texture is a required output from any pipeline, as it gets displayed onscreen
after all *`RenderPasses`* execute.
~~~~~~~~~~~~~~~~~~~~~~~~~~~~~~~~C
void ConstantColorPass::renderGui(Gui* pGui)
{
// Add a GUI widget allowing us to dynamically change the displayed color
pGui->addFloat3Var("Color", mConstColor, 0.0f, 1.0f);
}
~~~~~~~~~~~~~~~~~~~~~~~~~~~~~~~~
Our *`renderGui`* defines what widgets are available to interact with when we open the GUI window
for the *`ConstantColorPass`*. In this case, we'll have an RGB color control (i.e., a *`float3`*)
where all components can freely be changed between the values of *`0.0f`* and *`1.0f`*.
~~~~~~~~~~~~~~~~~~~~~~~~~~~~~~~~ C
void ConstantColorPass::execute(RenderContext::SharedPtr pRenderContext)
{
// Get a pointer to a Falcor texture resource of our output channel
Texture::SharedPtr outTex =
mpResManager->getTexture(ResourceManager::kOutputChannel);
// Clear the texture to the appropriate color
mpResManager->clearTexture(outTex, vec4(mConstColor, 1.0f));
}
~~~~~~~~~~~~~~~~~~~~~~~~~~~~~~~~
The *`execute`* method is invoked when the pipeline wants us to perform our rendering tasks.
For a simple pass like *`ConstantColorPass`*, we have exactly two goals:
1. Get a handle to the buffer that will be displayed on screen, and
2. Clear this buffer to the user-specified constant color.
To do the first task, we simply ask our resource manager for the requested texture. This only
works if we called *`requestTextureResource`* with the corresponding texture during pass initialization.
The resource manager handles creation, destruction, and sharing of all textures that any pass has
requested. It also handles resizing of screen-sized buffers (all textures default to screen size unless
a different size is requested).
We then call the *`clearTexture()`* utility method that is part of the *`ResourceManager`* class. This
hides some DirectX details (i.e., how to clear a resource varies depending on what _resource views_
it be bound with).
What Does it Look Like?
===============================================================================
That covers the important points of this tutorial. Now if you run it, you get a result similar to this:
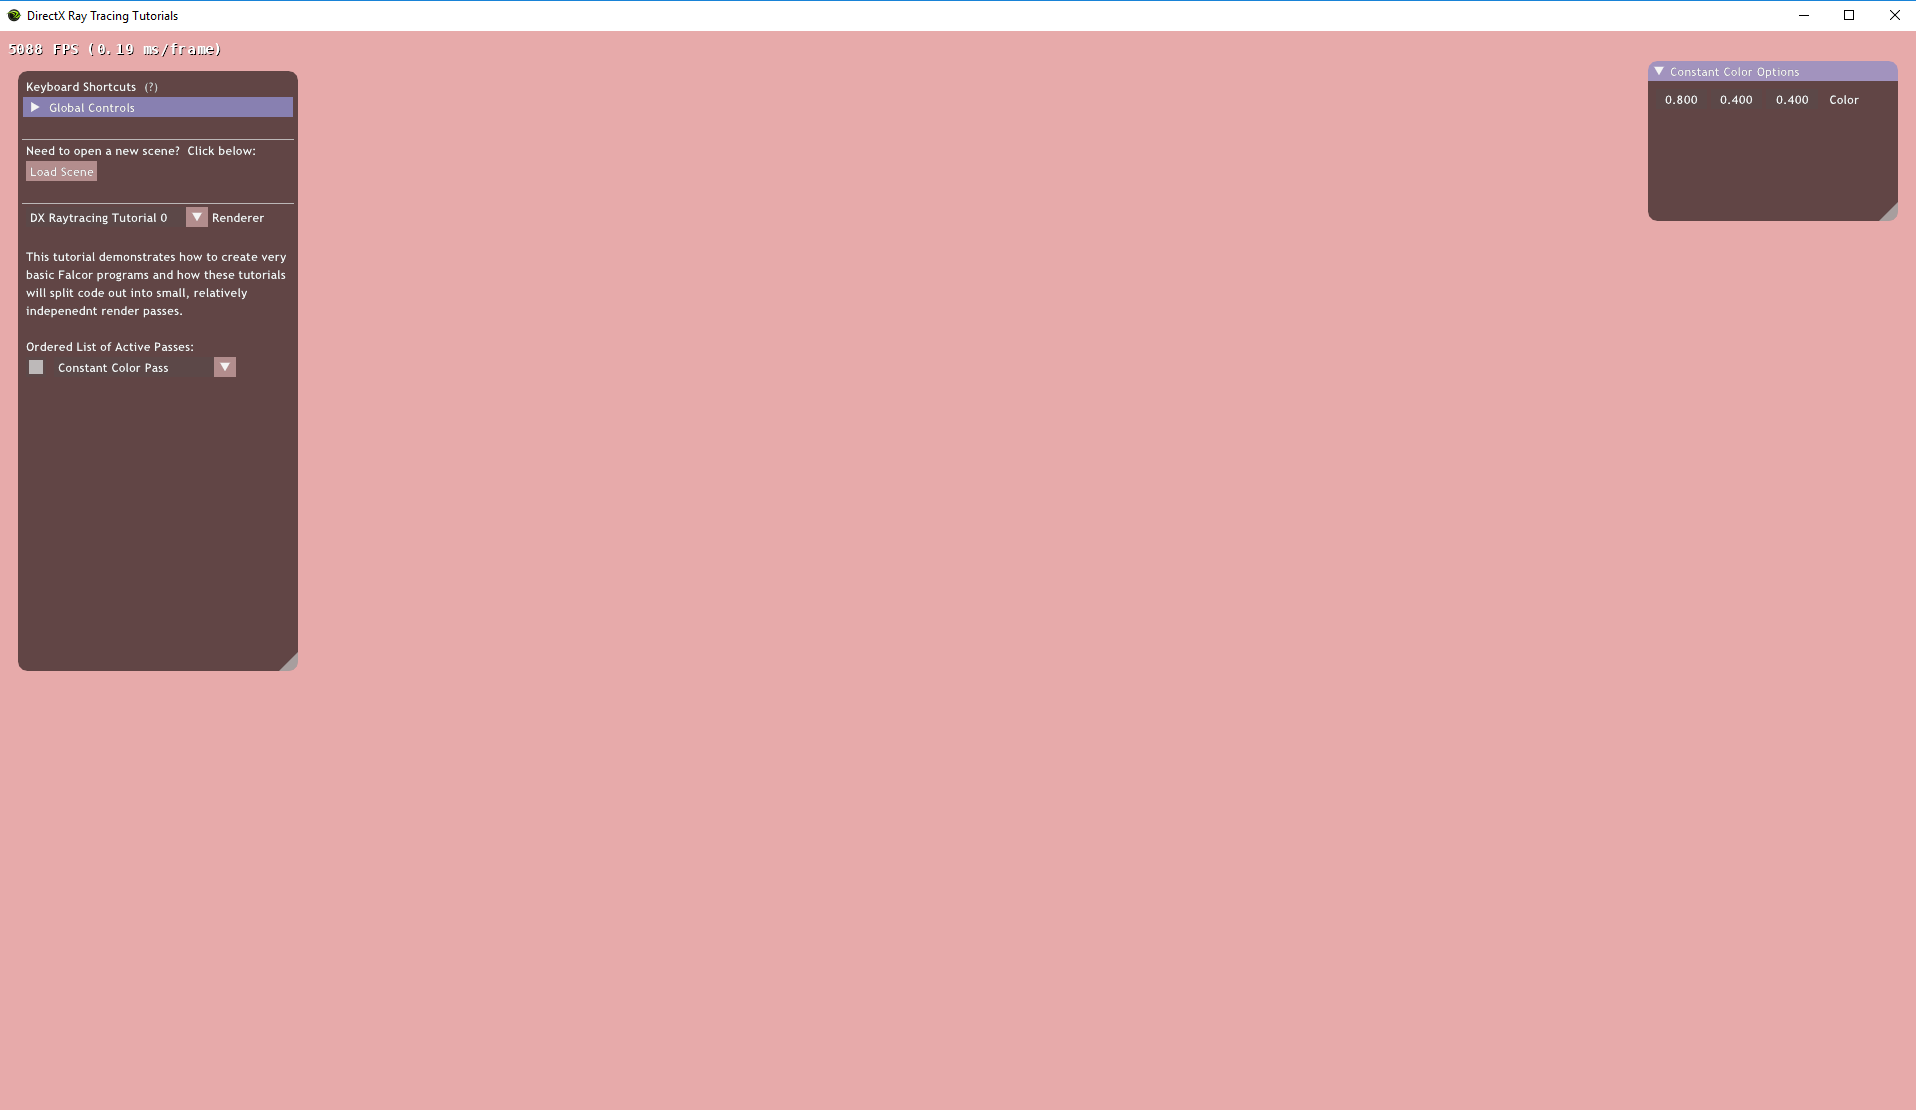
To open the GUI window for the *`ConstantColorPass`*, click the little box to the left of the
text "Constant Color Pass" in the main window GUI.
Hopefully, this tutorial clarified how to set up a simple application with our framework and
define a basic render pass to control what appears on screen. We will skip many of these basics
and ignore the boilerpate in future tutorials.
When you are ready, continue on to [Tutorial 2](../Tutor2/tutorial02.md.html), where we build
a _slightly_ more complex raster pass with a basic HLSL shader.